let’s see some basic code samples that involve:
basic features of
opencvandyolopre-trained machine-learning models
these reworked samples were inspired by this MOOC in French
https://www .linkedin .com /learning /l -essentiel -d -opencv -avec -python -pour -le -deep -learning /solution -suivre -les -positions -des -epaules -et -des -genoux
# numpy

import numpy as np
# a utility to display images in the notebook
from IPython.display import Image# the name of the pypi package is odd, but life is odd, so..
# here's the name to use with pip
# %pip install opencv-python
import cv2---------------------------------------------------------------------------
ModuleNotFoundError Traceback (most recent call last)
Cell In[3], line 5
1 # the name of the pypi package is odd, but life is odd, so..
2 # here's the name to use with pip
3 # %pip install opencv-python
4
----> 5 import cv2
ModuleNotFoundError: No module named 'cv2'# finally, our own utilities
from utils_image import show_image# ...
# beware that there are a few other more exotic dependencies
# that you will have to pip-install as we goimages
the first part of this notebook is about dealing with images
reading and displaying an image
openCV comes with its own API for displaying and interacting with an image
import cv2
from utils_image import show_image
img = cv2.imread('./media/people-2.jpg')show_image(img)# BEWARE: the image loaded with cv2 is encoded as BGR, and not! RGB
# so if I pass this (cv-encoded) image to matplotlib,
# colors go bananas (blue bananas here, actually :)
import matplotlib.pyplot as plt
plt.imshow(img);# if you need to reorder the channels
# in the order expected by mpl you can do e.g. this
plt.imshow(img[:, :, ::-1]);RGB-alpha
import cv2
import numpy as np
import matplotlib.pyplot as plt
from utils_image import show_image
img = cv2.imread('./media/people-2.jpg')b, g, r = img[:, :, 0], img[:, :, 1], img[:, :, 2]# we will display each of the the 3 channels
# and as we don't specify a colormap,
# the result is rendered in black and white
# and black means a low value for that channel
imgs = np.concatenate((b, g, r), axis=1)show_image(imgs)# let us add a transparency that amounts to b (why not..)
img_b = cv2.merge((b, g, r, b))# imshow does not show transparency - we save in a png file ...
show_image(img_b, store_in_filename="BGRB.png")# ... so that we can check transparency with another tool
# here mpl
plt.imshow(plt.imread("BGRB.png"));Rotation
import cv2
from utils_image import show_image
img = cv2.imread('./media/people-2.jpg')# rotating by pi/4 clockwise around the top left corner (0, 0)
# compute the matrix
R1 = cv2.getRotationMatrix2D((0,0), -45, 1)
# apply it
rotated_1 = cv2.warpAffine(img, R1, (img.shape[0], img.shape[1]))show_image(rotated_1)# rotating by pi/2 anti clockwise around the center
# get size
h, w, _ = img.shape
# compute matrix
R2 = cv2.getRotationMatrix2D((w/2, h/2), -90, 1)
# apply it
rotated_2 = cv2.warpAffine(img, R2, (img.shape[1], img.shape[0]))show_image(rotated_2)Blurring
import cv2
from utils_image import show_image
img = cv2.imread('./media/people-2.jpg')
blur = cv2.GaussianBlur(img, (51, 51), 0)show_image(blur)resize / strech
import cv2
from utils_image import show_image
img = cv2.imread('./media/abstract.jpg')
# scaling down by 0.5 in x and y
img_res = cv2.resize(img, (0, 0), fx=0.5, fy=0.5)show_image(img_res)# scaling up with different factors along x and y
# NOTE that x is horizontal and y vertical
# that's the usual way (but unlike mpl !)
img_res = cv2.resize(img, (0, 0), fx=3, fy=0.5)show_image(img_res)# scale to target image size 500 x 500 pixels
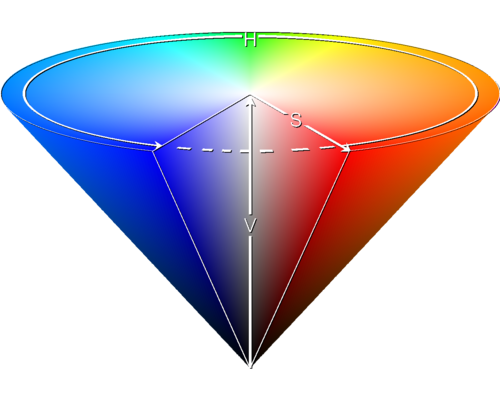
img_res = cv2.resize(img, (500, 500))show_image(img_res)HSV
HSV stands for hue saturation value
(in French TSV = teinte saturation valeur)
we’ll see a use case in the next section
import cv2
import numpy as np
from IPython.display import Image
from utils_image import show_image
# let us look at the 3 channels
# for this input image
img = cv2.imread('./media/abstract.jpg')show_image(img)# here are the 3 channels on top of one another
img_hsv = cv2.cvtColor(img, cv2.COLOR_BGR2HSV) # le faire en numpy
h, s, v = img_hsv[:, :, 0], img_hsv[:, :, 1], img_hsv[:, :, 2]show_image(np.concatenate((h, s, v), axis=0))exercise: write it in numpy
the formulas for translating RGB into HSV are given here:
HSL and HSV#General approach
you may want to write your own conversion tool in raw numpy
detecting specific areas
trying to find skin-like colors (and a use case for HSV coordinates)
import cv2
import numpy as np
from utils_image import show_image
# reading colors is the default behaviour
img = cv2.imread('./media/people-2.jpg', cv2.IMREAD_COLOR)
# moving to HSV coordinates
img_hsv = cv2.cvtColor(img, cv2.COLOR_BGR2HSV)show_image(img)# display the 3 channels
h, s, v = img_hsv[:, :, 0], img_hsv[:, :, 1], img_hsv[:, :, 2]
hsv_split = np.concatenate((h, s, v), axis=1)show_image(hsv_split, window_name='img_hsv')# for an - arguable - skin detection:
# 1) saturation becomes 255 if > à 40
ret_s, min_s = cv2.threshold(s, 40, 255, cv2.THRESH_BINARY)
# 2) hue is set to 255 if < 15 (BINARY_INV)
ret_h, max_h = cv2.threshold(h, 15, 255, cv2.THRESH_BINARY_INV)
# 3) bitwise AND of both images
# i.e. keep only pixels that have both criteria
# s > 40 and h < 15
img_skin = cv2.bitwise_and(min_s, max_h)show_image(img_skin)edge detection
import cv2
import numpy as np
from utils_image import show_image
# an image using grayscale
img = cv2.imread('./media/abstract.jpg', cv2.IMREAD_GRAYSCALE)show_image(img)# only one channel here, values in 0..255
img.shape, img.dtype# a tentative approach with numpy only
# put 0 or 1 depending on
# value < threshold -> 0
# value > threshold -> 1
# but the result is not convincing at all
threshold = 150
img_bw = np.zeros(img.shape)
img_bw[img > threshold] = 255show_image(img_bw)# the same idea using cv2
# still not convincing of course
threshold = 150
ret, img_bw_cv2 = cv2.threshold(img, threshold, 255, cv2.THRESH_BINARY) # idemshow_image(img_bw_cv2)# BUT much better if
# the threshold is COMPUTED for each pixel - here on a 11x11 square
img_nb_cv2_adap = cv2.adaptiveThreshold(
img, 255,
cv2.ADAPTIVE_THRESH_GAUSSIAN_C,
cv2.THRESH_BINARY,
11, # size of the neighbourhood area - must be an odd number (pixel is in the center)
5, # constant that is subtracted from the mean or weighted sum of the neighbourhood pixels
# something loosely related to contrast...
)show_image(img_nb_cv2_adap, window_name='img_gris adaptative')selecting among detected edges
as an example, let’s find the contour that has the largest area
import cv2
import numpy as np
from IPython.display import Image
from utils_image import show_image
img = cv2.imread('./media/abstract.jpg')
gray = cv2.cvtColor(img, cv2.COLOR_BGR2GRAY)
thresh = cv2.adaptiveThreshold(gray, 255, cv2.ADAPTIVE_THRESH_GAUSSIAN_C, cv2.THRESH_BINARY, 11, 1)show_image(thresh)# another method to find contours
contours, hierar = cv2.findContours(thresh, cv2.RETR_TREE, cv2.CHAIN_APPROX_SIMPLE)
# let's show what was found
img2 = img.copy()
thickness = 2
color = (0, 0, 0)
img3 = cv2.drawContours(img2, contours, -1, color, thickness)show_image(img3)# let's find the one with maximal area
areas = [cv2.contourArea(c) for c in contours]
# what is the index of the largest contour in this list ?
i = areas.index(max(areas))
# let's extract the largest contour
# BUT as we shall see, in fact this is artificial,
# and corresponds to a global frame around the picture
the_largest_contour = contours[i]# just the contour
img4 = cv2.drawContours(
np.ones(img2.shape, dtype="uint8")*255,
[the_largest_contour], -1, color, thickness)show_image(img4)# so we're going to ignore this one, and take the second largest
# remove that contour from the list
contours2 = contours[:i] + contours[i+1:]
# compute the largest in that new list
areas = [cv2.contourArea(c) for c in contours2]
i = areas.index(max(areas))
the_largest_contour = contours2[i]# just the contour
img4 = cv2.drawContours(
np.ones(img2.shape, dtype="uint8")*255,
[the_largest_contour], -1, color, thickness)show_image(img4)face detection with pre-trained model
import cv2
from utils_image import show_image
img = cv2.imread('./media/people-3.jpg')
# remember we're in BGR at this point
gray = cv2.cvtColor(img, cv2.COLOR_BGR2GRAY)
# this file contains the parameters of a pre-trained model
# for face detection - frontal, not from the side
path = "data/haarcascade_frontalface_default.xml"
face_cascade = cv2.CascadeClassifier(path)
# use the model
faces = face_cascade.detectMultiScale(
gray, scaleFactor=1.10, minNeighbors=5, minSize=(40, 40))
# outline detected faces on the image
for (x, y, w, h) in faces:
cv2.rectangle(img, (x, y), (x+w, y+h), (0, 255, 0), 2)# and voilà
show_image(img, window_name="face-detection")eyes detection with pre-trained model
import cv2
from utils_image import show_image
# same business of course, let's see the results
# performs well on people-2, not so much on the others
img = cv2.imread('./media/people-2.jpg')
gray = cv2.cvtColor(img, cv2.COLOR_BGR2GRAY)
# pick the model
path = "data/haarcascade_eye.xml"
eye_cascade = cv2.CascadeClassifier(path)
# use it
eyes = eye_cascade.detectMultiScale(
gray, scaleFactor=1.02, minNeighbors=20, minSize=(10, 10), maxSize=(40, 40))
# outline with circles this time
for (x, y, w, h) in eyes:
xc = x + w//2
yc = y + h//2
rc = w//2
cv2.circle(img, (xc, yc), rc, (255, 255, 0), 2)show_image(img, window_name="eyes-detection") # attention peut détecter des tas d'oeils partout !dealing with videos
let us now see how opencv can help display and deal with videos
display a video and react to mouse events
in this first example, we are going to
display a short video
let the user click with the mouse, and add a red circle at the clicked position
user can also quit earlier by typing ‘q’
feel free to first watch the video in ./media/cars-city.mp4 using your usual viewer, so you can see the changes.
import cv2
from IPython.display import Image
# for starters we define a 'callback'
# i.e. a function that will be called
# each time an event occurs
# in our case the event is: "user has clicked"
# its purpose is to store 3 global variables
# mouse-x mouse-y and color
# that can then be used by the rest of the code
def mouse_callback(event, x, y, flags, param):
# we keep track of the last clicked position
# and color in these global variables
global mouse_x, mouse_y, color
# just to illustrate how to know which
# mouse button was used
if event == cv2.EVENT_LBUTTONDOWN:
print("Left Pressed", x, y)
mouse_x, mouse_y = (x, y)
# remember, this is RED
color = (0, 0, 255)
if event == cv2.EVENT_RBUTTONDOWN:
print("Right Pressed", x, y)
mouse_x, mouse_y = (x, y)
# and this is GREEN
color = (0, 255, 0)# and now we can write the code for achieving the goal (see above)
# being global, these variables can be read
# by all the code below
# reset then here:
# we don't want to inherit the click from previous runs
mouse_x, mouse_y, color = None, None, None
# load the video - it will empty as we read it with capture.read()
capture = cv2.VideoCapture("./media/cars-city.mp4")
# using .read(), we can get each video frame individually
# so we can
# - display the video frame
# - and a colored circle if there has been a click previously
# some constants
radius = 5
line_width = 3
window_name = "image"
window_x, window_y = (0, 0)
# initialize
cv2.namedWindow(window_name)
cv2.setMouseCallback(window_name, mouse_callback) # lien avec notre fonction callback
# we can now loop ever the video
# the return from capture.read() is a tuple with
# ret: bool if False, the video is over
# frame: image otherwise, frame contains the next image
ret, frame = capture.read()
# until the end of the video
while ret:
# arbitrarily, make the video half its size
frame = cv2.resize(frame, (0, 0), fx=0.5, fy=0.5)
# if a click has occurred, let's add a colored circle
if mouse_x is not None:
cv2.circle(frame, (mouse_x, mouse_y), radius, color, line_width)
# while we're at it, add a frame around the image
cv2.rectangle(frame,
# rectangle size
(10, 10), (frame.shape[1]-10, frame.shape[0]-10),
# rectangle color and linewidth
(0, 255, 255), 2)
# display that frame
cv2.imshow(window_name, frame)
cv2.moveWindow(window_name, window_x, window_y)
# shows in the foreground
cv2.setWindowProperty(window_name, cv2.WND_PROP_TOPMOST, 1)
# then read the next frame
ret, frame = capture.read()
# finally, allow for a shortcut
# if user types 'q' then we bail out early
ch = cv2.waitKey(1)
if ch & 0xFF == ord('q'):
break
# we are done, so let's clean up
capture.release()
cv2.destroyAllWindows()
# like with show_image, this is required for smooth operation
# on MacOS at least
cv2.waitKey(1);exercise: refactor into a function
you may want to refactor this code so that it all fits into a single function, say display_video_track_mouse_clicks(filename)
tip
if you go down this road, you may wish to check for the nonlocal Python keyword
indeed one of the advantages of refactoring would be to remove the need for global variables, which are always a bad idea ;)
face detection on video
it is possible to go way further than just that; for example here we display another video, and in the process we outline human faces as recognized by an AI model.
the input video can be watched in ./media/friends.mov
of course the callback mechanism is still available if needed, but for the sake of simplicity we do not use it here
import cv2
from IPython.display import Image
# from utils_image import show_image
def display_video_highlight_faces(
# one mandatory parameter
video_filename,
# these 2 parameters are also mandatory
# they must be functions - see how they are used below
init_model, run_model,
# the * here essentially says:
# you need to name any of the following parameters
# this is because their order is not meaningful
*,
# the rest is just boilerplate
window_name="image",
window_x=0, window_y=0, window_fx=0.5, window_fy=0.5,
# also here we decide that any other named parameter
# will be passed along to the run_model() function
**kwargs):
# like above, load the video file, which will
# empty itself as we call .read()
capture = cv2.VideoCapture(video_filename)
# init_model must be a function with no argument
# and it must return a model
model = init_model()
cv2.namedWindow(window_name)
# load first frame
ret, frame = capture.read()
while ret:
# see above
frame = cv2.resize(frame, (0,0), fx=window_fx, fy=window_fy) # ? (0, 0)
# the model needs to remember what has been seen so far
# this is the purpose of the run_model function
# which must be passed by the caller
run_model(frame, model, **kwargs)
# nothing new from here on, see previous example for details
cv2.imshow(window_name, frame)
cv2.moveWindow(window_name, window_x, window_y)
cv2.setWindowProperty(window_name, cv2.WND_PROP_TOPMOST, 1)
ret, frame = capture.read()
# get out if 'q' gets typed
ch = cv2.waitKey(1)
if ch & 0xFF == ord('q'):
break
capture.release()
cv2.destroyAllWindows()
# like always, required at least on MacOS
cv2.waitKey(1)def init_model():
path='data/haarcascade_frontalface_default.xml'
return cv2.CascadeClassifier(path)
def run_model(img, model, **kwargs):
gray = cv2.cvtColor(img, cv2.COLOR_BGR2GRAY)
faces = model.detectMultiScale(gray, **kwargs)
for (x, y, w, h) in faces:
cv2.rectangle(img, (x, y), (x+w, y+h), (0, 255, 0), 2)# cap = cv2.VideoCapture("./media/friends.mov")
display_video_highlight_faces(
"./media/friends.mov", init_model, run_model,
# since none of these names are known to display_video_highlight_faces
# they will actually passsed along to run_model
# and thus to detectMultiScale()
scaleFactor=1.10, minNeighbors=5, minSize=(40, 40), maxSize=(80, 80),
)as you can see the result is interesting, although not quite perfect yet...
pose detection (human body structure)
in this section we demonstrate a utility that can detect the overall position of human body
this time the original video is in ./media/player-man.mov
# if needed:
%pip install mediapipeimport cv2
from IPython.display import Imagetry:
import mediapipe as mp
except ModuleNotFoundError as exc:
print("WARNING - as of 2025 October, mediapipe works with Python <= 3.12 only")
raisedraw_tool = mp.solutions.drawing_utils
posEstimation = mp.solutions.posepose = posEstimation.Pose() # INFO: Created TensorFlow Lite XNNPACK delegate for CPU.# here again a function would come in handy...
# you know the drill..
capture = cv2.VideoCapture("./media/player-man.mov")
ret, frame = capture.read()
while ret:
frame = cv2.resize(frame, (0,0), fx=0.5, fy=0.5)
frame_rgb = cv2.cvtColor(frame, cv2.COLOR_BGR2RGB) # BGR -> RGB
res = pose.process(frame_rgb) # applying the tensorflow model
if res.pose_landmarks:
# this utility actually adds on the frame
# the structure found by the model
draw_tool.draw_landmarks(frame, res.pose_landmarks,
posEstimation.POSE_CONNECTIONS)
cv2.imshow("pose estimation", frame)
cv2.moveWindow("pose estimation", 0, 0)
cv2.setWindowProperty("pose estimation", cv2.WND_PROP_TOPMOST, 1)
ret, frame = capture.read()
# type 'q' to quit
ch = cv2.waitKey(1)
if ch & 0xFF == ord('q'):
break
capture.release()
cv2.destroyAllWindows()
cv2.waitKey(1);pose estimation - spotting specific body parts
as a slight elaboration upon the previous scenario, it is possible to fine tune the set of points we are interested in, picking among these:
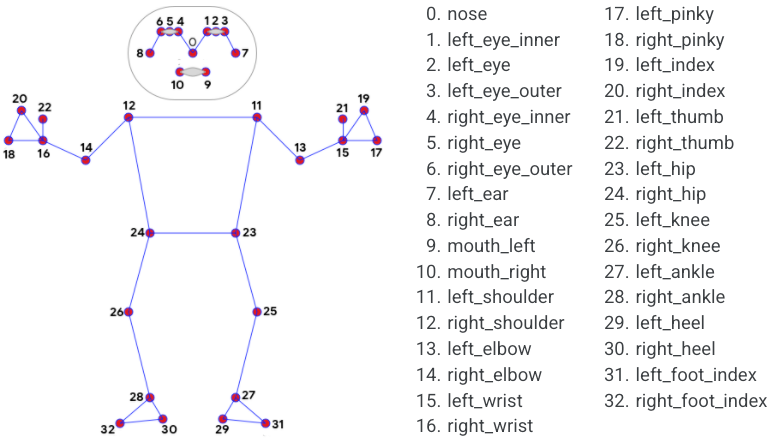
so let’s say we want to spot
shoulders (11 & 12)
hips (23, 24)
knees (25, 26)
and ankles (27, 28)
here’s the code to do that
original video this time is located in ./media/player-woman.mov
LANDMARKS = [11, 12, 23, 24, 25, 26, 27, 28]
WHITE = (255, 255, 255)
import mediapipe as mp
import cv2draw_tool = mp.solutions.drawing_utils
posEstimation = mp.solutions.pose
pose = posEstimation.Pose() # INFO: Created TensorFlow Lite XNNPACK delegate for CPU.capture = cv2.VideoCapture("./media/player-woman.mov")
ret, frame = capture.read()
while ret:
frame = cv2.resize(frame, (0,0), fx=0.5, fy=0.5)
frame_rgb = cv2.cvtColor(frame, cv2.COLOR_BGR2RGB) # BGR -> RGB
# generating all points
# not sure if it's possible to generate only the ones we need ?
res = pose.process(frame_rgb)
if res.pose_landmarks:
# if we wanted them all
# draw_tool.draw_landmarks(frame, res.pose_landmarks,
# posEstimation.POSE_CONNECTIONS)
for l in LANDMARKS:
# print(t)
h, w, c = frame.shape
cx = int(res.pose_landmarks.landmark[l].x * w) # x, y sont en % d'image
cy = int(res.pose_landmarks.landmark[l].y * h)
# print(t, res.pose_landmarks.landmark[l].x, cx)
cv2.circle(frame, (cx, cy), 3, WHITE, cv2.FILLED)
# print(res.pose_landmarks)
cv2.imshow("pose estimation", frame)
cv2.moveWindow("pose estimation", 0, 0)
cv2.setWindowProperty("pose estimation", cv2.WND_PROP_TOPMOST, 1)
ret, frame = capture.read()
# si on tape 'q' on arrête l'affichage de la vidéo
ch = cv2.waitKey(1)
if ch & 0xFF == ord('q'):
break
capture.release()
cv2.destroyAllWindows()
cv2.waitKey(1);yolo
detecting objects on an image
# make sure to install these if needed

# %pip install ultralytics
# %pip install supervision
import cv2
from ultralytics import YOLO
import supervision as sv
from utils_image import show_image# model = YOLO("yolov8l.pt")# we go fetch the model from the Internet
# it seems like the file will be automatically cached locally by YOLO
model = YOLO("https://github.com/ultralytics/assets/releases/download/v8.1.0/yolov8n.pt")img = cv2.imread('./media/cars-city.png', 1)# YOLO detects objects
# here we run the model on the image
# it is actually a shorthand for
# res = model.predict(img)[0]
res = model(img)[0]# from_yolov8 is deprecated and replace by from_ultralytics
detections = sv.Detections.from_ultralytics(res)# let us inspect what the model has found
# as of ultralytics verion 8.2
# each detection object can be unpacked with 6 fields
first_detection = next(iter(detections))
a,b,c,d,e,f = first_detection
a,b,c,d,e,f# so the ones that we are interested in are these 2:
_, _, confidence, _, _, details = first_detection
confidence, details# so here is how to produce one label per detection
labels = [
f"{details['class_name']} - {confidence:0.2f}"
for _, _, confidence, _, _, details in detections
]
labels[:4]# rendering the result as an annotated image
# the easy way:
plotted = res.plot()
show_image(plotted)# rendering the result as an annotated image
# the less easy, but more customizable way:
# (and could use more tuning actually...)
box_annotator = sv.BoxAnnotator(
thickness=1,
text_thickness=1,
text_scale=1,
)
img = box_annotator.annotate(scene=img, detections=detections, labels=labels)show_image(img, window_name="YOLO")detecting objects in a video
it’s just a matter of applying the above method on each frame
not exactly smooth though, with a regular CPU...
import cv2
from ultralytics import YOLO
import supervision as sv

from utils_image import show_imagemodel = YOLO("yolov8l.pt")# on this clip we would detect persons
capture = cv2.VideoCapture("./media/friends.mov")
# on this one we would detect a person and a ball/firsbee
# capture = cv2.VideoCapture("./media/player-man.mov")
ret, frame = capture.read()
while ret:
frame = cv2.resize(frame, (0,0), fx=0.5, fy=0.5)
res = model(frame)[0]
detections = sv.Detections.from_ultralytics(res)
frame = res.plot()
cv2.imshow("YOLO", frame)
cv2.moveWindow("YOLO", 0, 0)
cv2.setWindowProperty("YOLO", cv2.WND_PROP_TOPMOST, 1)
# quit with 'q'
ch = cv2.waitKey(1)
print(f"{ch=}")
if ch & 0xFF == ord('q'):
break
ret, frame = capture.read()
capture.release()
cv2.destroyAllWindows()
cv2.waitKey(1)